How to Knead Bread Dough by Hand (With the Windowpane Test)
If there’s one skill that separates a dense, crumbly loaf from a light, airy one, it’s kneading. You can follow a recipe to the letter — measure your flour, proof your yeast, get the water temperature just right — but if you don’t knead the dough properly, none of it matters. The bread won’t rise the way it should. The crumb will be tight and uneven. The crust won’t have that satisfying chew.
Kneading isn’t complicated. It’s rhythmic, repetitive, and surprisingly therapeutic once you get the hang of it. But most beginner bakers either don’t knead long enough, add too much flour in the process, or simply don’t know what properly kneaded dough should feel like.
This guide will walk you through the exact technique, the timing, and the three tests that tell you when your dough is ready. By the end, you’ll know exactly what good dough feels like — and you’ll never second-guess yourself again.
Why Kneading Matters: The Science of Structure
When you mix flour and water, two proteins — glutenin and gliadin — combine to form gluten. Kneading develops that gluten into an elastic network of strands that trap the carbon dioxide produced by yeast. That’s what makes bread rise. That’s what gives it structure, chew, and an open, airy crumb.
Under-kneaded dough doesn’t have enough gluten development. The result is a loaf that doesn’t rise well, has a dense and crumbly texture, and falls apart when you slice it. The crumb will be tight and uneven, with small, irregular holes.
Over-kneaded dough is possible with a stand mixer (the motor can overwork the gluten), but it’s extremely rare when kneading by hand. You’d have to knead for 20-30 minutes straight, and your arms would give out long before the dough does. If it does happen, the dough becomes stiff, tears easily, and bakes into a tight, tough loaf.
The sweet spot is elastic, smooth, and slightly tacky dough that springs back when you poke it and stretches thin without tearing. That’s what we’re aiming for.
See the push-fold-rotate technique in action
Kneading is the single most transformative step in bread baking. Get this right, and everything else falls into place.
Phase 1
The Technique
Flour your surface lightly.
Dust your work surface with just enough flour to prevent sticking — a tablespoon or two. Less is more here. Too much flour gets incorporated into the dough as you knead, which dries it out and makes the final loaf dense and tight. If the dough sticks a little at first, that’s fine. It’ll firm up as gluten develops.
Use a bench scraper to keep your surface clean instead of adding more flour. It’s a game-changer for sticky doughs.
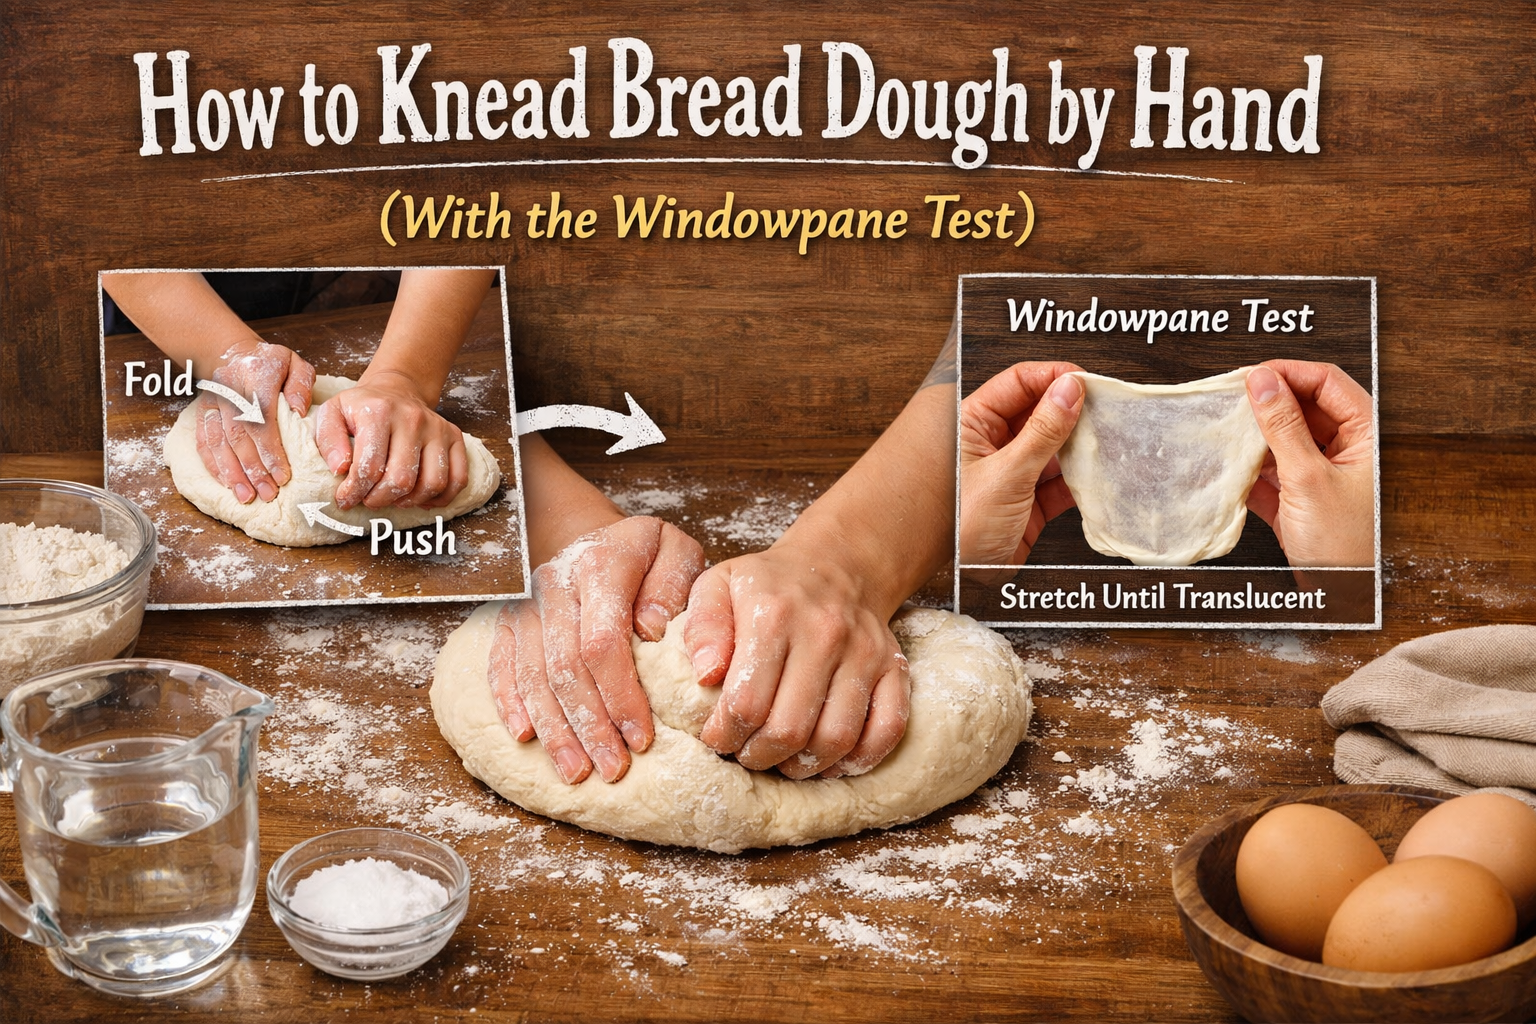
Push and fold: the core motion.
Place the dough on your work surface. Push the dough away from you with the heel of your hand, stretching it forward. Then fold the top half of the dough back toward you, like you’re folding a letter. Rotate the dough 90 degrees. Repeat. That’s the rhythm: push, fold, rotate. Push, fold, rotate. Your weight does the work, not your arm strength.
Find your rhythm: 8-10 minutes for most breads.
Keep that push-fold-rotate motion going steadily for 8 to 10 minutes. You’ll feel the dough change under your hands. It starts rough and shaggy. After a few minutes, it becomes smoother. By the 8-minute mark, it should feel elastic, alive, and slightly springy. Don’t rush it. The gluten network takes time to develop. If your dough fights back and snaps instead of stretching, give it a 5-minute rest, then continue.
Set a timer. Beginner bakers tend to under-knead because their arms get tired. 8 minutes feels longer than you think.
Adjust as you go.
If the dough is still sticky after 3-4 minutes of kneading, sprinkle in flour — one teaspoon at a time — and knead it in. Wait 30 seconds before adding more. If the dough feels dry and stiff, wet your hands slightly with water and continue kneading. The moisture from your hands will hydrate the dough without making it soupy.
Phase 2
Know When It’s Done
The poke test.
Press your finger into the dough about half an inch deep. If it springs back slowly and leaves just a faint indent, it’s ready. If your finger leaves a deep dent that doesn’t spring back at all, keep kneading — the gluten isn’t developed yet.
The windowpane test.
Pinch off a small piece of dough (about the size of a walnut). Gently stretch it between your fingers, working it thinner and thinner. If you can stretch it thin enough to see light through it without the dough tearing, the gluten is fully developed. If it tears before you can see through it, knead for another 2-3 minutes and test again. This is the gold standard for perfectly kneaded dough.
The windowpane test works for all yeast breads. It’s especially important for high-hydration doughs like ciabatta or focaccia.
The feel: trust your hands.
Properly kneaded dough is smooth on the surface, slightly tacky to the touch (not sticky), and feels elastic and alive when you handle it. It should spring back when you poke it and hold its shape when you form it into a ball. If it slumps and spreads like pancake batter, it needs more kneading. If it’s stiff and tears when you try to shape it, you may have added too much flour.
Hand Kneading vs. Stand Mixer: What’s the Difference?
Both methods work. Both develop gluten. The difference is in timing, control, and feel.
By Hand (8-12 minutes)
You have complete control over the dough. You feel it change under your hands — from rough and shaggy to smooth and elastic. It’s slower, but it builds intuition. You learn what good dough feels like, which makes you a better baker in the long run.
It’s also surprisingly meditative. The repetitive motion, the rhythm, the smell of the dough — there’s something deeply satisfying about it.
Stand Mixer with Dough Hook (5-7 minutes)
Faster and less physically demanding. Set the mixer to medium-low speed and let it run. Watch for the dough to pull away from the sides of the bowl and climb up the hook. When it does, it’s almost ready. Give it another minute, then check with the windowpane test.
The risk with a mixer is over-kneading. If you let it run too long, the gluten can break down, and the dough will become sticky and slack. Pay attention.
Either method works. If you’re new to bread baking, start by hand. It takes a little longer, but you’ll build the kind of intuition that makes you confident with any dough.
Tips From Our Kitchen
Don’t add too much flour
This is the single biggest mistake beginner bakers make. A slightly sticky dough is easier to fix than a dry one. You can always add flour, but you can’t take it out. When in doubt, knead a little longer before adding more.
Rest the dough if it fights back
If your dough is elastic but tears easily or snaps back aggressively when you try to stretch it, it’s tight. Cover it with a towel and let it rest for 5 minutes. The gluten will relax, and it’ll be much easier to work with.
Wet doughs benefit from stretch-and-fold
High-hydration doughs like ciabatta, focaccia, and some sourdoughs are too sticky to knead the traditional way. Instead, use the stretch-and-fold method: wet your hands, grab one edge of the dough, stretch it up, and fold it over itself. Rotate the bowl 90 degrees and repeat. Do this every 30 minutes during the bulk rise.
A dough scraper keeps your surface clean
Instead of scraping sticky dough off your counter with your hands (and then adding more flour to clean them), use a bench scraper to lift and fold the dough. It gives you better control and prevents you from over-flouring.
The Single Skill That Changes Everything
Kneading isn’t glamorous. It doesn’t have the drama of pulling a golden loaf out of the oven or the satisfaction of slicing into a perfect crumb. But it’s the step that makes all of that possible.
Once you learn what properly kneaded dough feels like — smooth, elastic, alive under your hands — you stop second-guessing yourself. You stop wondering if you kneaded long enough. You just know.
And that’s when bread baking stops feeling like a mystery and starts feeling like muscle memory. The kind of skill that stays with you forever.