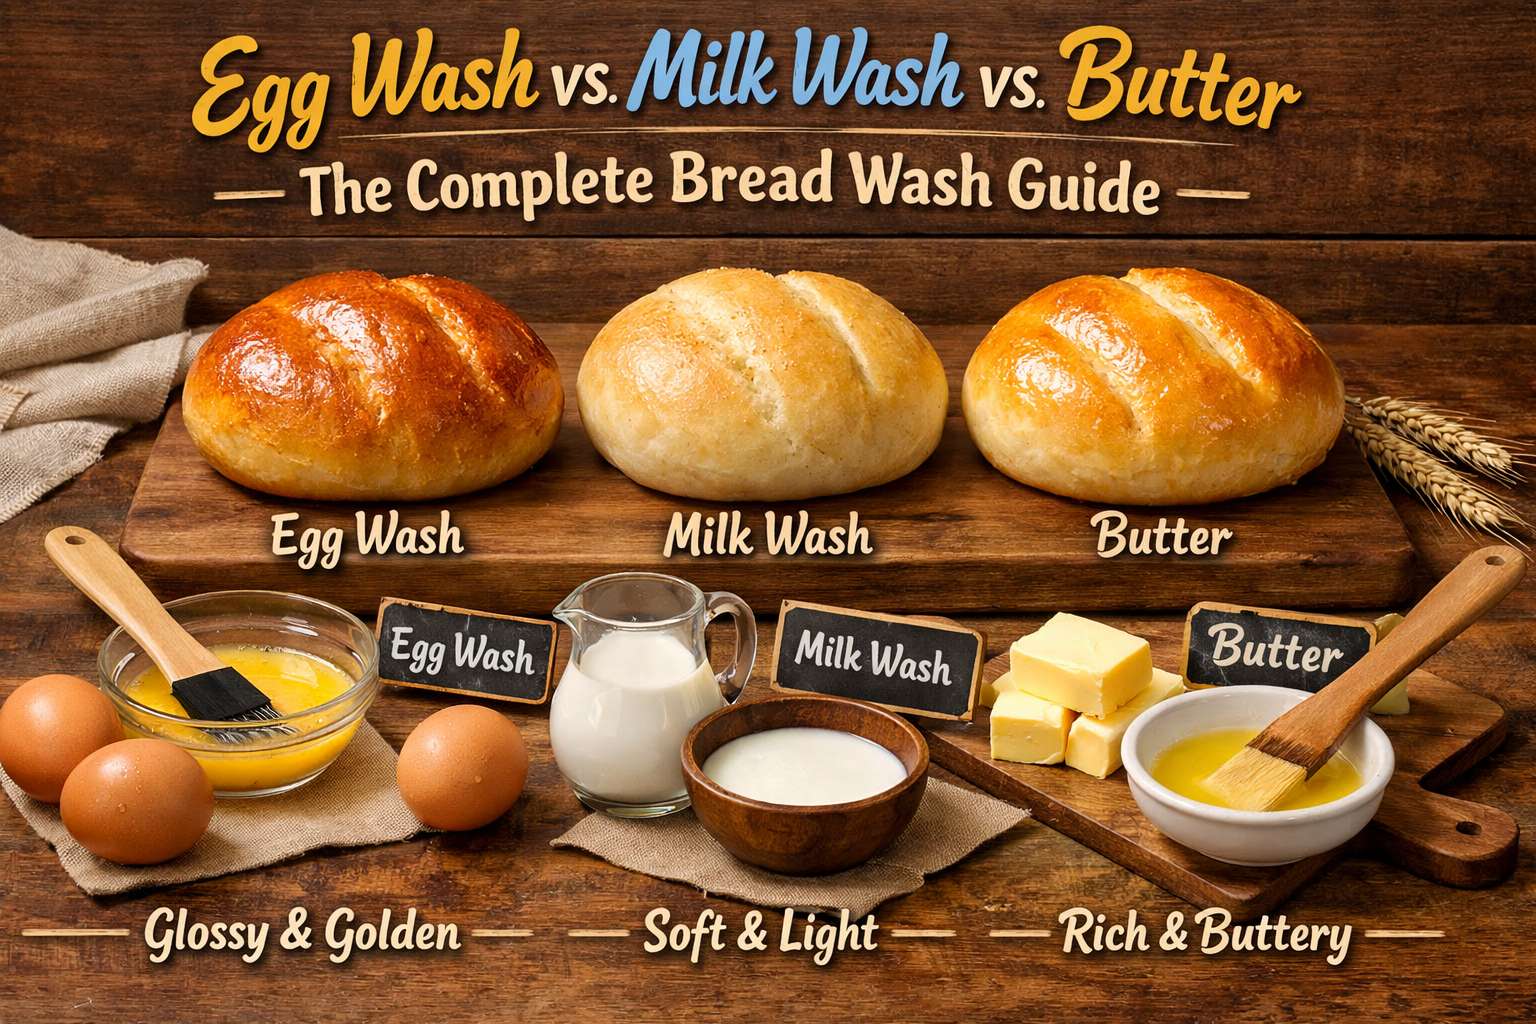
Where to Let Bread Dough Rise: 7 Warm Spots in Your Kitchen
The most common question from beginner bread bakers isn’t about flour or yeast or kneading technique. It’s this: Where do I put the dough while it rises? The counter feels too cold. The windowsill gets drafty. The top of the fridge seems random. And if you’ve ever had a loaf that took three hours to double in size (or one that over-proofed in 45 minutes), you know that location matters more than most recipes let on.
Here’s the truth: yeast is a living organism. It thrives in warmth, slows down in the cold, and dies in the heat. Most home kitchens hover around 68–72°F — a few degrees too cool for an ideal rise. That’s not a dealbreaker, but it means your dough will take longer and develop differently than the recipe promises.
This guide walks you through seven warm spots you already have in your kitchen, explains why temperature matters, and gives you the tools to proof dough like someone who’s been doing it for years — even if this is your first loaf.
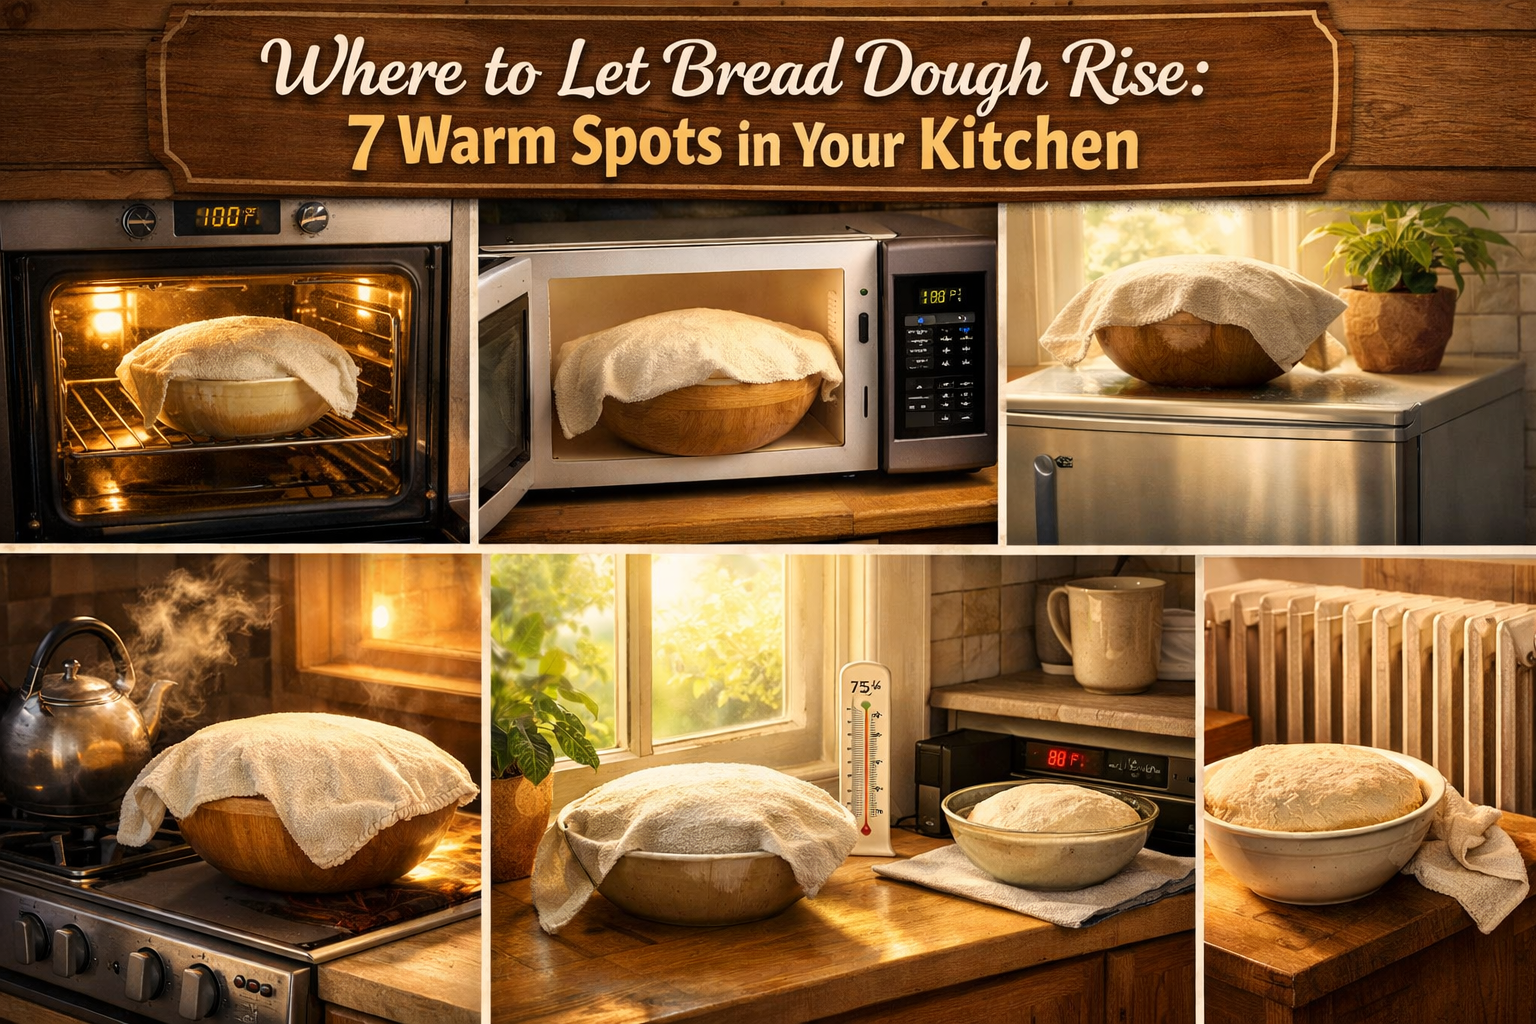
See the oven-light method and microwave steam hack in action
Why Temperature Matters (And What the Numbers Mean)
Yeast is alive. It’s a single-celled fungus that eats sugar, releases carbon dioxide, and gives bread its rise. When you mix flour and water, enzymes break down starches into simple sugars — yeast food. The warmer the environment, the faster yeast metabolizes that sugar. The colder it gets, the slower everything moves.
The sweet spot: 75–80°F (24–27°C). In this range, yeast is active but not frantic. Your dough doubles in 60–90 minutes, depending on the recipe. The gluten has time to relax and strengthen. The flavor develops complexity.
Too cold (below 70°F): Yeast slows down. Your rise takes longer — sometimes twice as long. That’s not necessarily bad. Slower fermentation can create deeper, more nuanced flavors, which is why professional bakers use cold proofing (more on that below). But if you’re following a recipe that calls for a 1-hour rise and yours takes 3 hours, you’ll wonder what went wrong.
Too hot (above 90°F): Yeast goes into overdrive. Your dough balloons quickly, but the gluten doesn’t have time to develop properly. The texture suffers. Flavor suffers. And if it gets above 120°F, the yeast dies. Game over.
Most kitchens sit at 68–72°F — just a few degrees below the ideal zone. That’s why finding a warm spot makes such a noticeable difference. You’re not trying to turn your kitchen into a sauna. You just need 5–10 degrees of extra warmth, and a draft-free space where the temperature stays consistent.
You’re not trying to turn your kitchen into a sauna. You just need a consistent warm spot and a little patience.
7 Warm Spots for Proofing Bread Dough
Oven with the Light On
Turn your oven off. Turn the interior light on. Close the door. That’s it. The incandescent bulb (or even an LED in newer ovens) generates just enough heat to bring the oven cavity up to 78–82°F — the perfect proofing temperature. The enclosed space is draft-free, consistent, and dark enough that the dough won’t dry out (as long as it’s covered).
Works best for: Any dough. Any rise. This is the gold standard for home bakers.
Microwave with Hot Water
Boil a mug or bowl of water in the microwave for 2 minutes. Leave the water inside. Place your covered dough bowl next to it (not touching). Close the microwave door. The steam creates a warm, humid environment — around 75–80°F — that’s ideal for rising. The humidity also keeps the dough surface from drying out, which is a bonus for delicate doughs like brioche or challah.
Pro tip: For rises longer than 30 minutes, reheat the water halfway through to maintain temperature.
Works best for: Shorter rises (30–90 min). Enriched doughs that benefit from humidity.
Top of the Refrigerator
Refrigerators vent warm air from the compressor coils, and that heat rises. The top of your fridge is typically 2–5 degrees warmer than the rest of your kitchen. It’s not as controlled as the oven-light method, but it’s effortless — just set the bowl up there and forget about it. Make sure the bowl is stable and the surface is clean.
Works best for: Longer, slower rises (90 minutes or more). Rustic doughs that don’t need precision.
Near (Not On) a Radiator or Heating Vent
In winter, when your heat is running, radiators and floor vents become natural proofing stations. Place your covered bowl nearby — not directly on top, which can create hot spots and kill the yeast — but close enough to catch the ambient warmth. A kitchen towel under the bowl helps insulate and stabilize the temperature.
Watch out for: Drafts. Heating vents cycle on and off, so cover the dough well to avoid surface drying.
Works best for: Winter baking. Doughs that can handle slight temperature variation.
Inside a Turned-Off Dishwasher (After a Cycle)
Just ran a load of dishes? Open the dishwasher, let it vent for a minute so it’s not scalding hot, then place your covered dough bowl on the top rack. Close the door. The residual heat and steam create a humid, warm chamber that’s surprisingly ideal for proofing. It holds temperature for 30–60 minutes, which is perfect for shorter rises.
Pro tip: Wipe down the rack if there’s any food residue. You don’t want your dough bowl sitting in yesterday’s marinara.
Works best for: Short, opportunistic rises when you’ve just run a hot cycle.
On Top of the Dryer (While Running)
This one sounds odd, but it works. A running dryer generates steady, gentle warmth. Place your covered bowl on top (make sure it’s stable — use a towel as a buffer if needed). The slight vibration from the drum actually helps distribute heat evenly through the dough. It’s not the most convenient spot unless you’re already doing laundry, but it’s effective.
Works best for: Multitaskers who time their dough rises with laundry day.
DIY Proofing Box (Oven + Bowl of Hot Water)
This is a step up from the oven-light method. Turn your oven off. Place a bowl or pan of steaming hot water on the bottom rack. Place your covered dough on the top rack. Close the door. The hot water creates a humid, warm environment you can control — refresh the water every 30 minutes for longer rises. This mimics a professional proofing box and gives you the most consistent results.
Temperature control: Boiling water = hotter. Warm tap water = gentler. You can dial it in based on your dough and timeline.
Works best for: Precision bakers who want full control. Sourdough. Enriched doughs. Competition-level loaves.
How to Tell When Dough Has Risen Enough
Recipes tell you to let dough rise “until doubled in size,” but what does that actually look like? Here’s how to check without guessing.
The Poke Test (Most Reliable)
Lightly flour your finger. Gently press it into the dough about ½ inch deep. Watch what happens:
- • The indent fills back slowly (5–10 seconds): Perfect. Your dough is ready to shape or bake.
- • The indent springs back quickly: Not ready yet. Give it another 15–20 minutes.
- • The indent doesn’t spring back at all (or the dough deflates): Over-proofed. The gluten structure has weakened. You can try gently deflating and reshaping for a shorter second rise, but the texture won’t be ideal.
Visual Cues
Look for these signs:
- • The dough has roughly doubled in size (use a clear container with volume markings if you want to be precise)
- • It looks puffy and pillowy, not dense or tight
- • When you tilt the bowl, the dough feels noticeably lighter than when you started
Remember: Timing is a guideline, not a rule. Temperature, humidity, flour type, yeast freshness — all of these affect how fast dough rises. Trust the poke test more than the clock.
Cold Proofing: The Overnight Method
If you’ve ever eaten sourdough from a good bakery and wondered why the flavor is so much deeper than homemade loaves, this is why: cold fermentation.
Instead of proofing at room temperature for 1–2 hours, you cover the dough tightly and refrigerate it for 12–24 hours (sometimes up to 72 hours for sourdough). The cold temperature slows yeast activity to a crawl. It still rises — just very, very slowly. Meanwhile, enzymes in the flour break down starches and proteins, creating complex flavors and a more open, irregular crumb structure.
How to Cold Proof
- Mix and knead your dough as usual. No changes to the recipe.
- Cover it tightly. Use plastic wrap, a lid, or a damp towel secured with a rubber band. You don’t want the dough to dry out.
- Refrigerate for 12–24 hours. The dough will rise slowly. By morning, it should be noticeably puffier (but not necessarily doubled).
- Pull it out 1–2 hours before shaping. Cold dough is stiff and hard to work with. Let it come to room temperature (around 65–70°F) so it’s pliable.
- Shape and bake as usual. You’ll notice the dough smells tangier, the crumb is more open, and the crust has deeper color.
Best for: Sourdough, pizza dough, focaccia, ciabatta, bagels — any bread where you want deep, complex flavor and an artisan texture.
Not ideal for: Enriched doughs like brioche or challah (the cold can make the butter solidify and create texture issues). Quick breads or buns that rely on a fluffy, tender crumb.
Tips From Our Kitchen
Always cover your dough
Use plastic wrap, a damp towel, or a shower cap (yes, really) to prevent a skin from forming on the surface. That dried-out layer can restrict rise and create tough spots in the final loaf.
Cold kitchen? Oven-light method is your best friend
In winter, when room temp drops to 65°F or lower, yeast crawls. The oven-with-light-on method gives you a consistent 78-80°F every time, no matter what the thermostat says.
Avoid direct sunlight
It might seem like free heat, but direct sun creates temperature swings as clouds pass or the angle shifts. You want steady warmth, not a rollercoaster.
Use a thermometer
Stick an oven thermometer or probe thermometer in your proofing spot to see the actual temp. Guesswork is fine until you have a loaf that takes 3 hours to rise or collapses from overproofing.
Over-proofed dough can be rescued
If your dough has gone too far (it looks deflated or smells boozy), gently punch it down, reshape it, and let it rise again for half the original time. It won't be perfect, but it's better than starting over.
The Right Spot Changes Everything
You don’t need a proofing box. You don’t need a warming drawer or a fancy bread machine. You just need to understand what yeast wants: consistent warmth, no drafts, and a little humidity. Pick a spot that works with your kitchen, your schedule, and the bread you’re making.
The oven-light method is reliable. The microwave-steam trick is clever. Cold proofing gives you flexibility and better flavor. Try a few, see what fits your rhythm, and pay attention to how the dough responds. Over time, you’ll stop checking the clock and start trusting the poke test. That’s when you know you’ve figured it out.
And if you’re serious about bread — if you’re the kind of person who wants to understand not just what works but why it works — the right tools make a difference. A clear proofing bucket with volume markings. A thermometer that takes the guesswork out. A banneton basket that shapes your loaves like a pro. They won’t teach you technique, but they’ll make the process smoother, more consistent, and a lot more enjoyable.